Been working on several items. Stripped all glass frames and have had all glass i.e doors and rear 1/4 re done in the green tint auto glass
Due to get frames back from chrome plater in the next day
Body work 95% complete and fire wall painted
Engine rebuild finally commenced - hope to have the heads on by the end of up coming week end
bottom end all in place, cam in and timing set ( have gone for a 456 stroker kit - not without its head aches)
Thanks to Big M have managed to find a 62 727 Push Button trans to fit my new 440 crank as the late model crank would not bolt up with the original torqueflite trans
Dropping trim off at the upholsters this week to get a start on the seats and progress thru to other items
Been getting lots of other parts all ready to put on the car once back at home
Struggling to get any feed back from Gary Goers - so will need to wait a bit longer to get rubber parts
Few pics attached
Again thanks to all of those who are always happy to help out with questions
Cheers
Vic
Firewall - still need to paint over the body deadenerPrior to chrome plating - my coach builder rebuilt one of the rear window front support frame as the original was totally rusted thruPrior to gold plating
stripped and ready to paint for new glassnew re-chromed mirrorsnew glasspaint samples - tweaked a little - going with the LHSseats ready to go off to upholsterer
Vic, if you need any info, measurements or pics of the upholstery let me know.
The front seats look pretty good but the rear seat isn't like it should be.
Got my chroming back - looks great but emptied my pocket!! (this being said happy with how the pot metal turned out on the front quarter window frames)
Worked on the engine over the weekend - managed to put the heads on and sort out the lifters & pushrods - the pushrods were just touching thru the guide hole so we had to grind out 8 of the inlet valve holes - that was fun!
I ended up using the 440 Source Aluminum heads with the 451 Stroker kit - think it might get around 370BHP but not really sure
Dropped off my interior at the upholsterers today - anticipate a couple of months before i see anything from them given their work load - but i thought i might as well join the cue
Hopefully this weekend we can finish off most of the top end on the engine so i can get it ready to paint
some more pics to add to the collection (apologies about the orientation of some of the pics)
Over the weekend we primed the motor with oil and checked that we had oil flowing thru the motor. Turns out the rocker shafts was on upside down and no oil flowing thru to the rockers. Turned it around and oil started flowing.
Hope to have head/valve spring adjusted this weekend and then look at painting the motor.
Got started on the rear tail lights. Had them re-chromed so re-assembled them. had to make temporary gaskets until i get some from Gary Goers.
Painted up the base frames of the glass windows, hope to install the new glass and surrounding frames shortly
Hope all are well.
Cheers
Vic
Bottom end now completesome more painting - brake booster support frame and fuel capwindow base support and guide rails paintedwindow base support and guide rails paintedexample of the existing tail light housing needing repairre-chromed - had to take out light socketslight socket put back inlight sockets completereasonably happy with chrome workfinished product - made up my own gaskets until my order from Gary Goers comes in
A few minor specs but otherwise pretty happy with the end result
Some more minor updates
Hoping to mount the body on the chassis in the next couple of weeks.
Engine is ready to paint - hopefully can do this in the next week - not enough hours in a day!! week!! year!!
Vic
John these where the ones you sent me - i had them re- chromedHad the mirrors redone as the chrome didnt extend far enough back within the housing - didnt realise the mirrors sat back a fair way
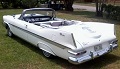
This is by no means a trailer queen. Once on the road i will take every opportunity to drive it - will even take it to work on Fridays (when the sun's shining). I guess once you start fixing something and you replace one part with a new part it just never stops!!
Had a little bit more progress lately:
Underside of body complete and has been all body schultz up
Chassis dropped off to body work shop so that the body can be mounted back on (have one more rear quarter that needs a bit of tender loving care and then we should be set to start painting)
Put all of the new side glass back into the re-chromed frames and support - pretty happy with results
For those who have firm/brittle side vent window rubbers I ended up soaking mine in power steering fluid for a few weeks - softened them up pretty good and was also able to clean them up with a scourer (removed some former overspray)
Engine almost complete - just need to adjust tappets and then set up distributor etc ready for when we finally get to start her up
Weather here is starting to finally warm up so can spend a bit longer in the garage at nights
 Viewed 6981 times")
 Viewed 6981 times")
 Viewed 6981 times")
 Viewed 6965 times")
 Viewed 6965 times")

 (this being said happy with how the pot metal turned out on the front quarter window frames)
 Viewed 6962 times")
 Viewed 6961 times")
 Viewed 6960 times")
 Viewed 6956 times")
 Viewed 6956 times")
 Viewed 6956 times")
 Viewed 6953 times")
 Viewed 8231 times")
 Viewed 8231 times")
 Viewed 6950 times")
 Viewed 8231 times")
 Viewed 8231 times")

 Viewed 8171 times")
 Viewed 6949 times")
 Viewed 6949 times")