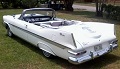
Dick Koch's convertible
Re: Dick's convertible project
Bernie - Thanks for the compliments but it would have to be a picture book, I have 1,450 pictures of the process, mostly so I would know how to put it back together. The paint is Eastwood Pure White single stage urethane and it is a very bright white, much whiter than my Desoto. I wasted a lot of money painting the Desoto with PPG paint at $450.00 a gallon plus catalyst and reducer, the Eastwood paint is only $140.00 a gallon including catalyst and you don't have to use a reducer. I figured why spend all that money when the car is going to spend 95% of it's time in a garage out of the sun anyway. The old original enamels lasted 50 years when a car was garaged. I did get the splash aprons from Gary Goers with the staples to attach them with. But you can also make them yourself with sheet rubber. I went with the Alternator because of the reliability factor and I might/maybe add AC later on. I try to stay true to originality except for those two thing, Alternator and After Market AC (Opps, also electric fuel pump). I put AC in the Desoto but the Generator couldn't keep up with it and it's embarrasing asking for a jump at a car show. I found a very nice pair of tail lightson ebay and later on a NOS tail light. The left one is the NOS with a very slight blemish and the right one has very little pitting.
Dick
Dick
Life is Beautiful! Sex, Beer & Mopars.
Re: Dick's convertible project
Listen up, I had a very serious Dash Delima and Dash learning experience. I installed the dash with the help of my son and found out the door weatherstrip has to be installed first. So I took the dash out and installed the weatherstrip and reinstalled the dash. I was going to use the single speed window washer system but I forgot to install it before I put the dash back in. It's not too bad to install with the dash in except the glove box is in the way!!!! So I had to take the dash out again for that. Since I had the dash was out I decided to remove the variable speed WW system from my 59 Desoto parts car and install it in the Convertible. Thats when I noticed the heater water valve operating cable in the Desoto opened the valve from the right hand side. I hooked up mine from the left hand side. Duh! John Quinn. I had the valve upside down, so I took off the hoses, turned the valve over and hooked up the cable correctly. Duh! John Quinn. Got all the wiring (very good shape) and the foot pump and installed it all in the Convert. and put the dash back in again. WHEW!!! Next I continued installing the wiring, switches, etc. YNZ makes it very easy with instructions that even and electrical dummy like me can do it, well maybe. The belvedere Convert. didn't have the rear arm rest courtesy lights but I was very fortunate to find a pair and with a very good wiring diagram in the Red 59 supplement I have all that wiring ready to install when I get my panels from SMS. I was also fortunate to find two front courtesy light that clip on the front kick panels and wired them up. I installed a momentary switch with a fuse for the fuel pump and an ON & OFF switch with a fuse to turn the front and rear courtesy light off and on when I want to, they will still operate with the door switches. Today I will finish hooking up all the wiring, switches, shift cable, speedometer cable etc. etc. etc. I have three Air Cleaner but they are for the larger 2 bb. carb. I was fortunate enough to get the correct Air Cleaner 2-5/8" dia. from John Fowlie. Then I was going to install the brake vacuum reservoir tank, I have three of those also but they are for the 59 Desoto and the mounting legs are different than on a 59 Plymouth. John is looking to see if he has one. Now I have to go get a present for Yvonne's birthday tomorrow. The first year we were married (1960) I forgot her birthday and have been paying for it ever since.
Dick.
Dick.
Life is Beautiful! Sex, Beer & Mopars.

Re: Dick's convertible project
Very impressive Dick!! You are making it look so easy but I know it is not.
If you can't find the brake vacuum reservoir tank let me know, I think we have a spare and I will bring it with me when I come to visit you.
Ron
If you can't find the brake vacuum reservoir tank let me know, I think we have a spare and I will bring it with me when I come to visit you.
Ron
Cars are to be Enjoyed, not Admired...
Re: Dick's convertible project
Thanks Ron - John Fowlie is checking to see if he has the vacuume tank for me. If not I will let you know. When is your arrival date.
Dick.
Dick.
Life is Beautiful! Sex, Beer & Mopars.
Re: Dick's convertible project
Dick, we will be arriving in Jacksonville November 17th. The first night we will stay at the Best Western airport hotel and the next day we will go to our vacation home in Haines City http://www.micazu.com/vacation-rentals/ ... rida-1220/# We will be there for 8 nights and we are not sure what we will do the last couple of days, maybe to the Keys or maybe to the west coast. Not sure when is the best time to visit Yvonne and that guy she married a long time ago  Are you going to any car shows in the last 2 weeks of November?
Maybe the Turkey Run?
Ron
Maybe the Turkey Run?
Ron
Cars are to be Enjoyed, not Admired...
Re: Dick's convertible project
Ron - We will accomodate your schedule but we had better see you at some time. I dont see any car shows scheduled but we can work around that.
Dick.
Dick.
Life is Beautiful! Sex, Beer & Mopars.
Re: Dick's convertible project
Ron - Bring the Vacuum tank with you, John Fowlie didn't have a decent one. If at all possible you should try to make the Turkey Rod Run in Daytona. It's a once in a lifetime event on Thanksgiving Weekend, Thurs Nov. 28 thru Sunday Dec. 1st. Five Thousand Cars and a parts field that takes 3 days by itself. Google "Turkey Rod Run".
Dick
Dick
Life is Beautiful! Sex, Beer & Mopars.
Re: Dick's convertible project
Code: Select all
See the pitchuhs.
Dick.
Life is Beautiful! Sex, Beer & Mopars.
-
RICKYMOPAR

- Posts: 523
- Joined: Wed Mar 11, 2009 9:58 pm
- Location: Broomfield, Colorado
Re: Dick's convertible project
OMG I am having way too much fun watching your project progressing!  Keep up the great work!
Re: Dick's convertible project
Yeh, I believe I went thru most of that when I did my cvt. Don't remember all the specific contortions, but i know I can't do them anymore. My eyesight is what bugs me most. I no longer have the abillity to focus near and far with standard glasses. Bifocals help with specific angles, but that's never enough, when under the dash, for example.
I never learned the paint skill.
So I have to say once again, Dick, you at age 71?, are doing FAR better than I could at my current age of 58.
Stamina figures in there as well.
Be appreciative that you are still "getting it done". I envy you.
I never learned the paint skill.
So I have to say once again, Dick, you at age 71?, are doing FAR better than I could at my current age of 58.
Stamina figures in there as well.
Be appreciative that you are still "getting it done". I envy you.
Re: Dick's convertible project
Roger - When I was 17 I wanted to be 25. Now that I'm 77 I still want to be 25.
Dick.
Dick.
Life is Beautiful! Sex, Beer & Mopars.
Re: Dick's convertible project
is there a typo here? Should read 67? LOL
Re: Dick's convertible project
Hokay, here's some more. Completed the brake system, bench bled the master cylinder and connected all the brake tubing. I had three brake vacuum tanks and none were correct for 59 Plymouth, 59 Plymouth has a different leg arrangement for mounting than the ones I had. I used the one in my 59 Desoto parts car by bending the legs a little and drilling two mounting holes in the inner fender. Nobody will know except for usens! I thought that mystery part I inquired about looked kinda familiar, see picture 2429. Next I started to install the window mechanismes in the doors, starting with the right hand side. I kid you not, it took me four hours to fiqure it out and get everthing right only to find out the regulator I thought I brought back to life would jam every time I tried to turn it. I got it out after destroying all my previous work and could get it to work only when it wanted to, not when I wanted it to. So I set that door aside, immediately got on ebay and don't you know, the only one availabe for a two door hardtop, passenger side was there, it was listed buy it now, so I did, I received it today and can now finish the doors. I really learned a lot on that door so the driver side was a snap. The new glass runs make the windows hard to get up and down so hopefully they will loosed up with use. Also got the weatherstrip installed. The steering wheel was in great shape (from Keig/Morton) no cracks, sanded it, 3 coats appliance epoxy black and 3 coats clear. Came out pretty nice. I got the air cleaner from John Fowlie and sandblasted it along with the top holdown strips and painted them. Moved over to the hood and installed the latch mechanism, insulation and rubber seal. There are two convertible top parts suppliers in Florida but I ordered mine from an outfit in Californis, they cost less even with freight $16.00 and included a free Bledder valued at $42.00. I have the cylinders, motor and hoses installed and will include pictures next time.
Dick
Dick
Life is Beautiful! Sex, Beer & Mopars.
Re: Dick's convertible project
Setting aside comments on your progress to inquire:
The UFO part...yes, it matches the cut-out on the window, but it's double-headed, whereas the actual window seems to have just the one end matching?
The problem with reproduction window seals is they are not "flocked" as were the originals. Flocking cut ssown on surface friction. I don't know how flocking is achieved, if you could do it, it would make a huge difference.
-
Mark Merritt
- Posts: 553
- Joined: Sun Sep 23, 2012 5:57 pm
Re: Dick's convertible project
Dick; your car is progressing amazingly,love the pics,sure has come A long long way!!! I was looking at your early posts and pics to now,what A transformation,love the color choices,white convertible,like riding on A cloud!!! She's going to be A beauty!!!!!!!!!!! Mark M
ONLY ORIGINAL ONCE!!!!!